We’re Expanding!


Thank you to all of our loyal followers. It’s been an incredible journey thus far. After some consideration we decided it was time for change so we’ve expanded our horizon to bring you more inspiration with a blog filled with art, techniques and useful tips for living a well balanced life! Check it out at:

FlowingWatersArt.wordpress.com.

Hoping you will stay with us.

Looking forward to seeing you there!

Watercolor Mixed Media Mandala


 Watercolor Mixed Media Mandala 
Created by Sophia Vida

I was inspired by my love for flowers to try something new. I created this mandala on an 8″ x 8″ watercolor block. I didn’t know where to start so I looked online and found many beautiful mandala designs. I purchased a few books too. The fear of the blank page was holding me back.  Finally I found the courage to pick up my compass and draw a few circles.

Little by little, it all started to come together. I was amazed at how the ideas for the next step just seemed to flow from my mind to the paper once I allowed the creative process to do its magic. It was quite fun to just let go and watch it unfold. Once I was happy with my sketch, I used watercolor crayons to paint the mandala. I added shading with colored pencils and highlights with a white pen. Last step was to outline the design with  a Micron 03 pen. I have another one that I’m working on and will share it with you as soon as it’s done.

Thanks for stopping by! Hope you enjoyed this post!!

Follow me:  Facebook   •   Pinterest     •    Tumblr     •     Flickr

Visit my Shop on Etsy: ColorExplosionStudio

Scandinavian Girl Mixed Media Watercolor


Scandinavian Girl Mixed Media Watercolor 
Created by Sophia Vida

I recently enrolled in Andrea Gomoll’s online class, Facecinating Girls Around the World. In this course Andrea teaches you how to paint various girls with different skin tones and hair.

The first painting I did is this Scandinavian girl. Since this painting is a part of the Facecinating Girls course, I can’t go into detail on how she was made. But she was so much fun to create. I highly recommend her class!

Andrea got me out of my comfort zone by using a color scheme I would never have put together myself. But I absolutely fell in love with this color combination as I watched this girl come to life.

Andrea Gomoll is a very talented teacher and artist who lives in Berlin, Germany. I love her fun and whimsical style of painting and am greatly looking forward to learning more from her class. Visit Andrea’s site at  Andrea-gomoll.de to learn more about her.

Thanks for stopping by! Hope you enjoy!!

Follow me:  Facebook   •   Pinterest     •    Tumblr     •     Flickr

Visit my Shop on Etsy: ColorExplosionStudio

Winnie the Pooh Watercolor


Winnie the Pooh Watercolor 
Created by Sophia Vida

Sorry I’ve been away for a while but I’ve been dealing with family matters which are still ongoing unfortunately. Although everything has been hectic, I’ve still managed to create some art but not as much as I would like. One of the reasons I love creating art is that it gives you a chance to escape life for a little. When you focus on creating your art, the outside world ceases to exist at least for a little while. For some, this can be a real life saver. For me, it helps me to keep my sanity, lol.

A few weeks ago I saw the new Christopher Robin Movie. I wasn’t sure how I’d feel about a non-animated Winnie the Pooh, but it was well made and I love it! I was inspired by one of the scenes from the movie with Winnie and his balloon and created this cute little painting.

I used Arches, 140lb Hot Pressed 7×10″ block. The hot pressed paper has a smooth finish, unlike cold pressed which has bumps and ridges.  I become very fond of using blocks of paper because it keeps your painting from buckling, especially when you’re using a lot of water like I did for the background.

I started by lightly sketching my image and then began painting using Caran D’Ache Neocolor Crayons. I didn’t color directly on the paper but instead, wet my brush and picked up color from crayon. This allowed me to have more control of the color saturation. I left the edges very loose for a more dreamy look.

Once I was happy with my painting I let it fully dry and used a Micron .005 Pen to outline the images. I used more of a sketchy line instead of a solid line to soften the painting. I used a 2B sketch pencil and a blending stump for a little shading.

This is probably one of the few paintings where I didn’t add any bling with Stickles. It took a lot of restraint but I think I’ll be okay, lol.

Last I lightly drew a wavey line at the bottom and added my quote from the Movie and Voila! I had a new one of a kind work of art!

I hope you enjoyed this post. Thanks for stopping by!

Follow me:  Facebook   •   Pinterest     •    Tumblr     •     Flickr

Visit my Shop on Etsy: ColorExplosionStudio


Cloth Paper Scissors Magazine is No More!


Sad news. One of my most favorite Magazines Cloth Paper Scissors has been shut down. I had a subscription and I received a post card in the mail today that they moved me over to Quilting Arts which I’m sure is very nice but I’m not a quilter. I’m a Mixed Media Artist. I called customer service and asked why, they said they didn’t know. But they were nice enough to send me a refund for the remaining subscription.

I’m so sad to see this fabulous magazine disappear. The issues were always filled with great articles on creating art which I absolutely loved reading. It was an inspirational publication and I was always thrilled when my new issue would arrive. I hope that they bring it back again.

True Love Whimsical Mixed Media Village


    “True Love” Whimsical Mixed Media Village
Created by Sophia Vida

I’m such a big fan of these fun little whimsical villages. For this project I used papers from a 2-sided paper Valentine Collection by K&Company called Circus Valentine. You can use a pad where all the guess work of combing different sheets is done for you. Or if you’re feeling bold and adventurous, you can select sheets from the open stock racks at your local craft store. For this village is used 7 different patterned sheets from the pad and 2 plain from my stash.

I started this project by coating a 9″ x 12″ canvas with gesso. Once dry I painted the background light and hot pink. Make sure to have the paint wrap around the canvas edges. While the paint was drying I planned my village by designing the houses. All the roof tops and houses are curved and slanted making whimsical.

Once I was happy with my layout, I glued the houses onto the canvas using Aleene’s Tacky Glue. I punched windows and doors from pink and white glitter cardstock and then glued those into place. I outlined the doors and windows with the Micron #03 pen and a Deco Color Glitter Paint Markers. Then I added a few highlights to the windows with a Glitter Blue Sakura Gelly Roll Pen.

I had a little too much open space at the top of the canvas, so I decided to add a few clouds with white acrylic paint. Once the paint was dry, I outlined the clouds with a Sakura Micron #03 pen.

I added a handful of valentine stickers to the canvas that I had in my supply stash. Using a purple gelato, I added shading to the village where needed. I also added a few doodles and outlines using the Micron #03 Pen. For a little bling, I added rhinestones for the door knobs and hearts from the chimney. Last I coated the canvas with gloss varnish to seal it and let it dry. And Voila! I had a unique whimsical mixed media Village!

Enjoy creating your own whimsical village!!

Thanks for stopping by.

Supplies used in this Project:
– 9″ x 12″ canvas panel
– K&Company Circus Valentine Stack (or any other coordinating papers – 9 in total)
– Gesso
– Liquitex Gloss Varnish
– Matte Mod Podge
– Faber Castell Pitt Pen or Sharpie Fine Point Pen
– Acrylic Paints: Pink, Hot Pink, White
– 1/2″ Flat Paint Brush
– Purple Gelato
– Valentine Stickers
– Rhinestones
– Sakura Micron Pen #03
– Glitter Blue Sakura Gelly Roll Pen
– Deco Color Glitter Paint Pens: Pink, Purple
– Aleene’s Tacky Glue
– Clean water and paper towels

Follow me:  Facebook   •   Pinterest     •    Tumblr     •     Flickr       •     Instagram

Visit my Shop on Etsy: ColorExplosionStudio

Goddess Divine Mixed Media


DSC_0001-Goddess Divine Mixed Media-Main Goddess Divine Mixed Media 
Created by Sophia Vida

This was a fun practice painting I made using watercolor paints in my 9″ x 12″ Strathmore Mixed Media Journal. I started out with a sketch, not knowing where is was going and before I knew it, this beautiful Goddess emerged.

The watercolor paints reacted a bit differently on the mixed media paper as compared to watercolor paper that I usually use. I got blobs of color that would quickly soak into the paper where I put it making it hard to blend and spread the paint. I also had to be careful not to use too much water as this paper was not as absorbent as watercolor paper and took a little longer to dry. Overall, I managed to save most of my blunders, lol.

I really love the background I painted using my glitter watercolors. This was the first time I used these paints and just love how they shimmer! It’s hard to see in the photos but it really sparkles.

For the outlining I used Micron Pens .005 and 01. I used a sketch pencil and various colored pencils for shading. The highlights were made using a white Posca fine tipped pen.

There are a lot of mistakes in this painting, but I love her just the same. Her bright blue hair is just fun!

Thanks for stopping by! Hope you enjoy!!

Follow me:  Facebook   •   Pinterest     •    Tumblr     •     Flickr

Visit my Shop on Etsy: ColorExplosionStudio


Your Story is Unique Watercolor


 Your Story is Unique Watercolor 
Created by Sophia Vida

This is another project that I made in Life Book 2018 with the help of a very talented artist, Katrina Koltes.

Since this painting is a part of Life Book 2018, I can’t go into detail on how she was made. I must say however, I’ve done lots of whimsical style faces and the thought of doing a more realistic one was quite intimidating. But to my surprise, I think I actually pulled it off!

Katrina Koltes is such a wonderfully talented teacher and artist. I love her dream like style of painting and can’t wait to learn more from her. Visit Katrina’s site at  katrinakoltes.com.

For more information on Life Book 2018 visit: Willowing.org

Thanks for stopping by! Hope you enjoy!!

Follow me:  Facebook   •   Pinterest     •    Tumblr     •     Flickr

Visit my Shop on Etsy: ColorExplosionStudio

Great Things Journal Pages


DSC_0002-GreatThingsJournalPages-MainOpen

Great Things Journal Pages
Created by Sophia Vida

Cloth Paper Scissors was having a Reader Challenge to create jaw dropping journal pages. Although I wasn’t chosen it was lots of fun creating them in my 5.5″ x 8″ Strathmore Mixed Media Journal.

I started coating the pages with Gesso. Next I adhered punched butterflies to the background from pages of an old book and sheet music using Matte Medium.

I sprayed a small amount of blue and green Dylusions inks into small paper cups and painted the background. I really love how bright and vivid these inks are. They really make your pages pop!

I then used fiber paste with a palette knife and stencil in the top right and left corner of the pages. After the paste dried I painted them with white acrylic paint and rubbed off the excess with a tissue. I also distress the outside edges of the pages with Ranger Black Soot.

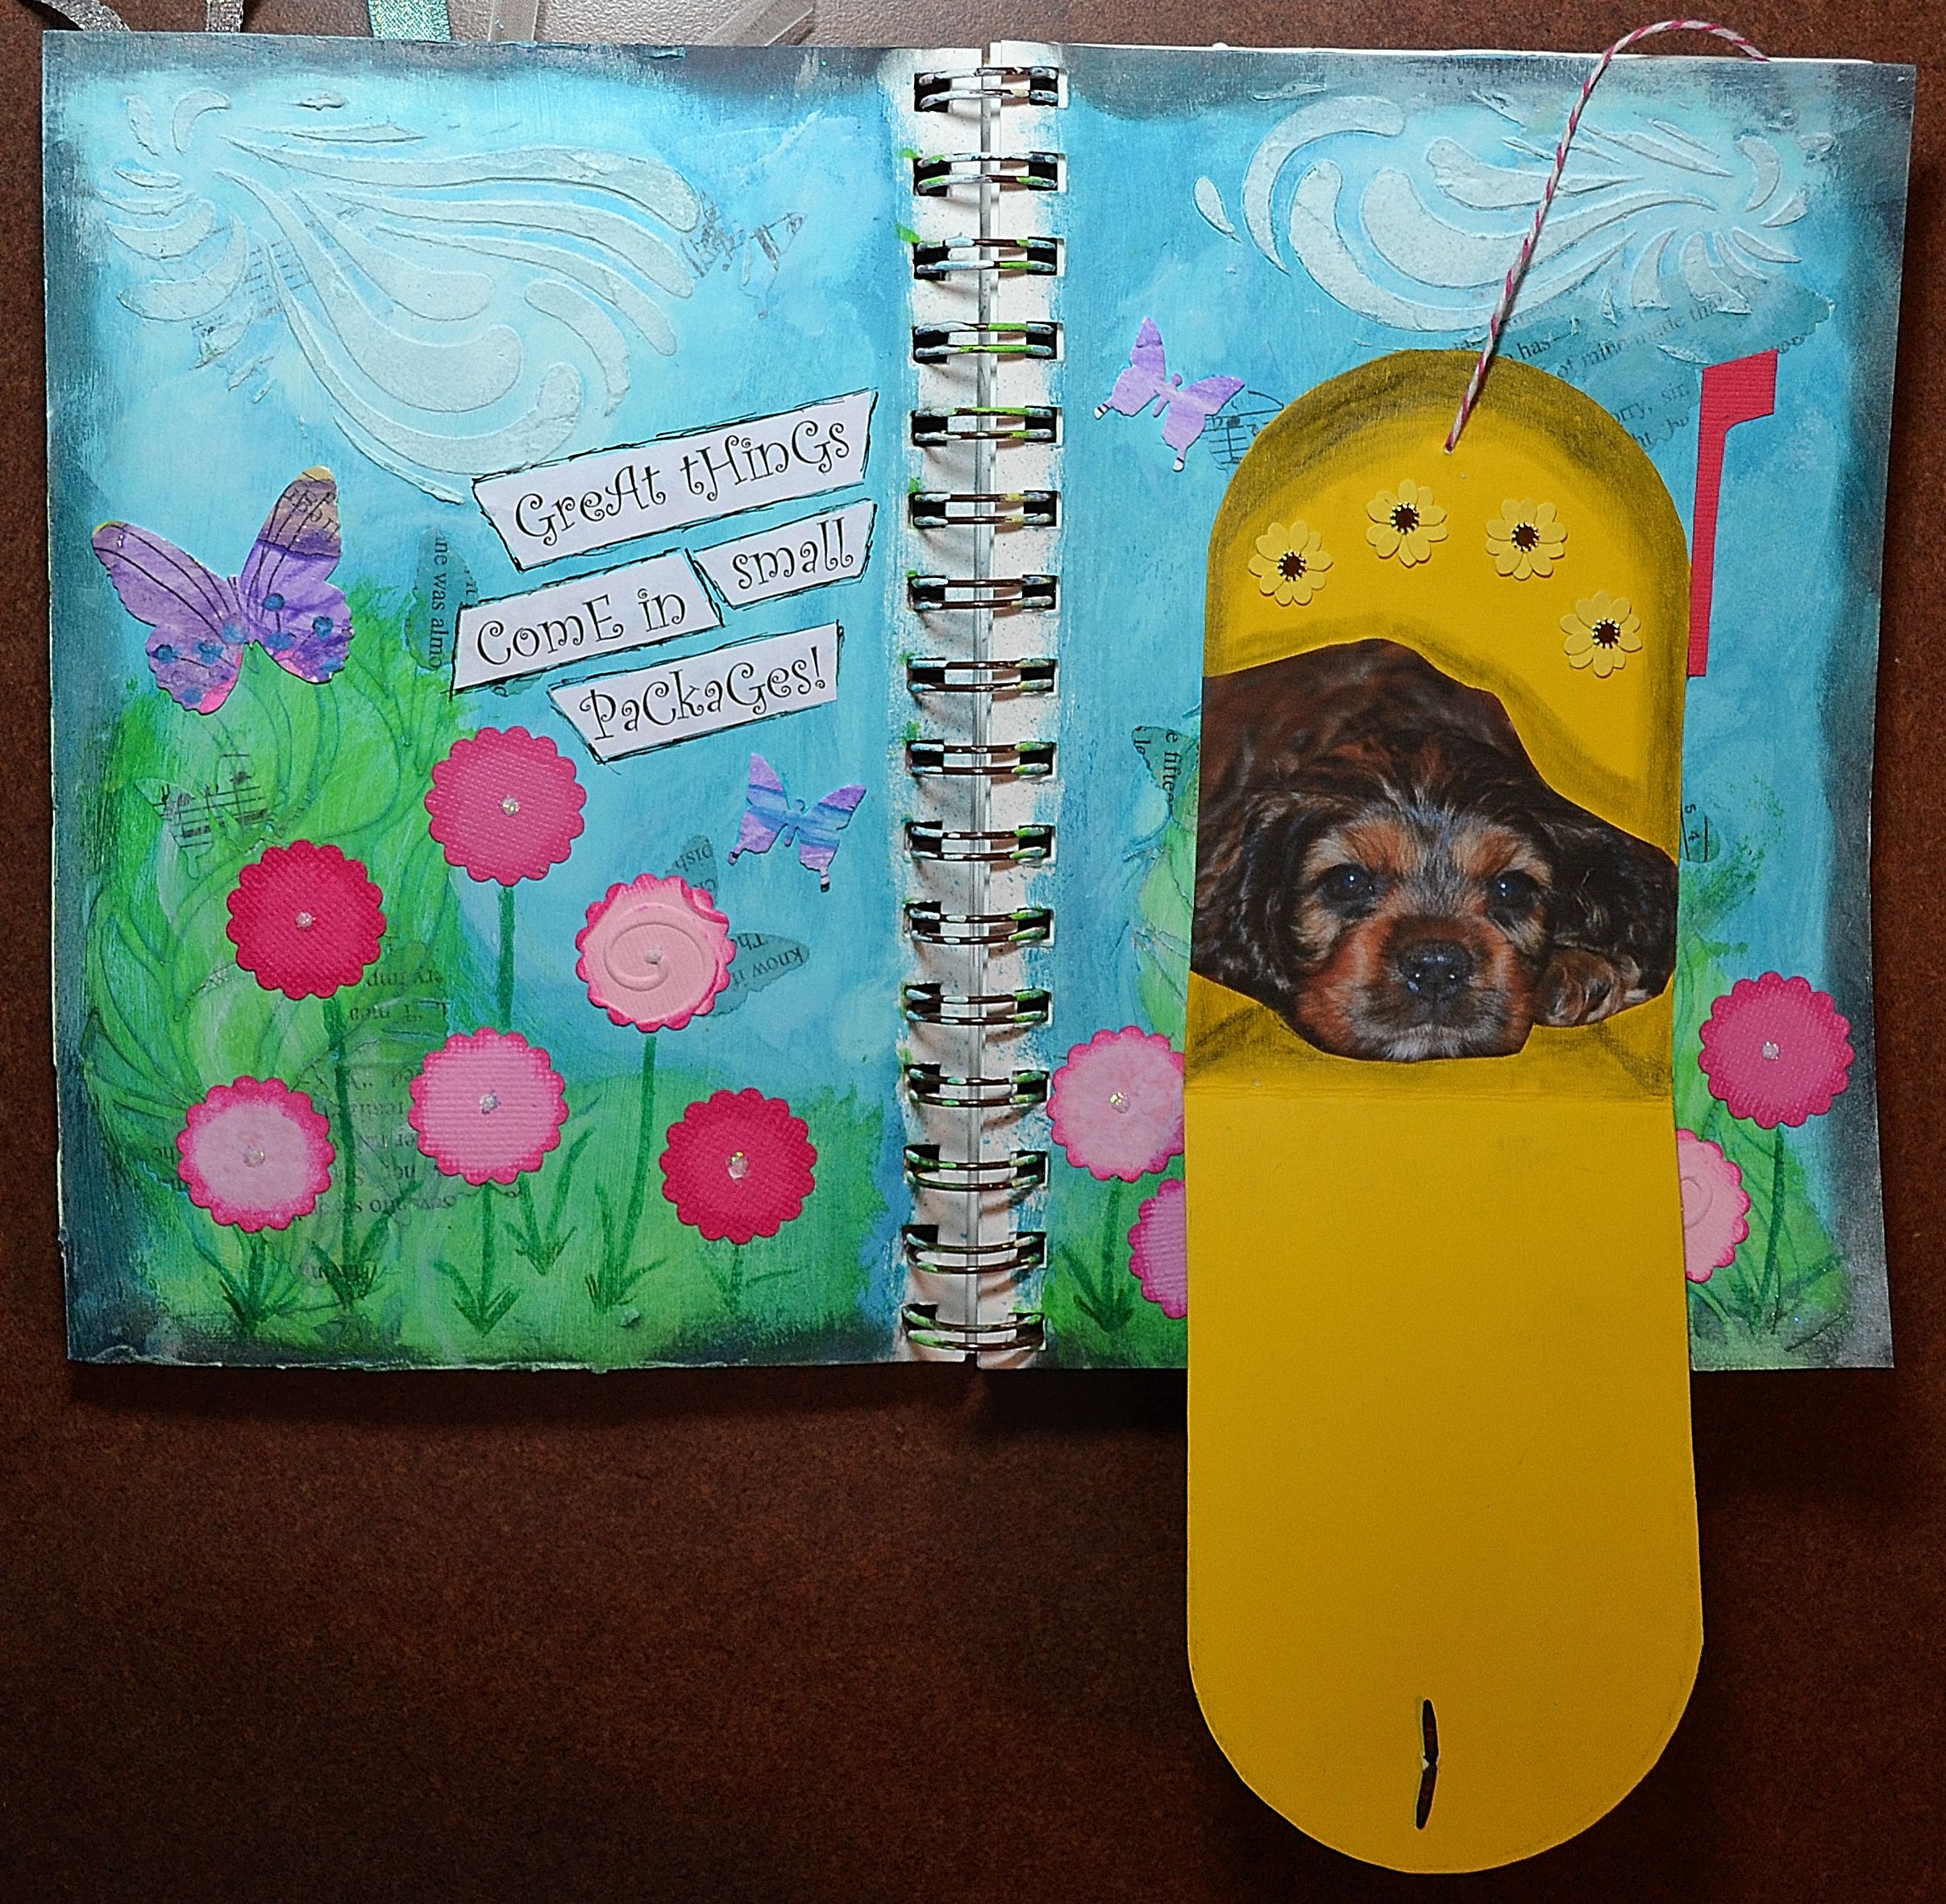
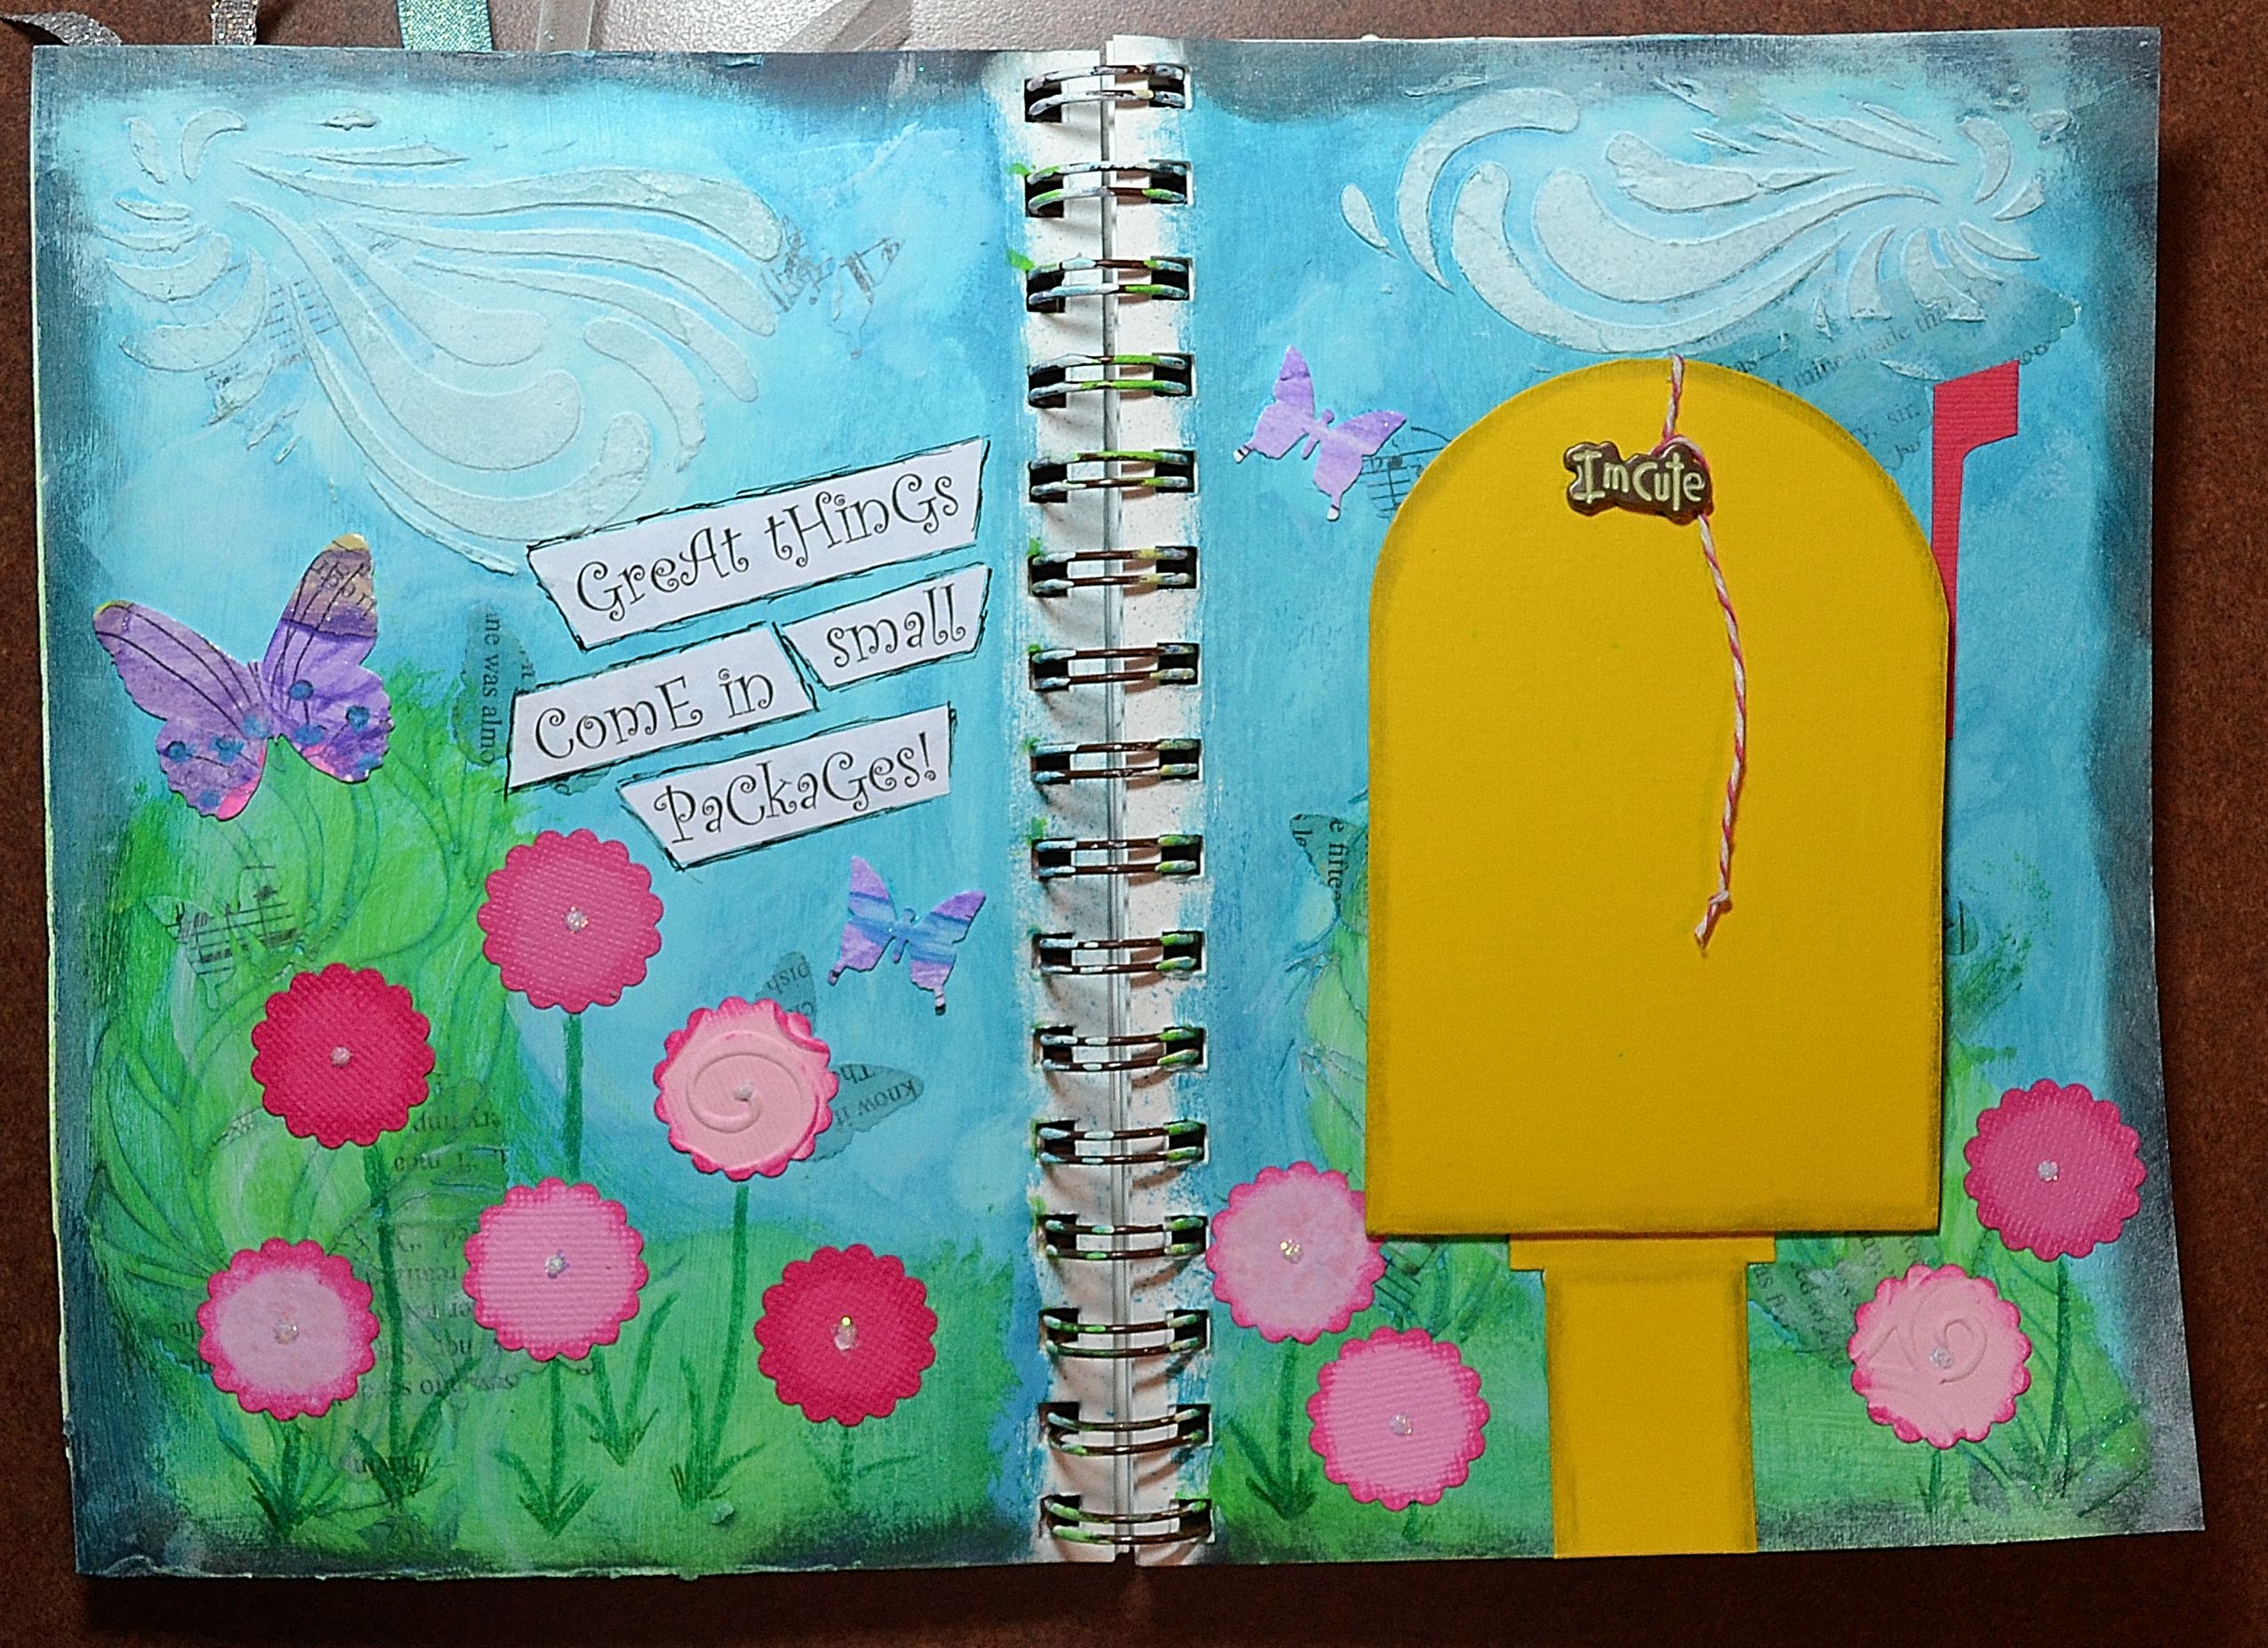
I designed my mail box by cutting a 9″ x 3″ rectangle from bright yellow cardstock. To get the ends nice and round, I used a circle stencil and cut them out. Next I folded this piece in half and inserted a brad on the right side that said “I’m cute.”  This will become the front of the mail box.

On the back of the mailbox I created a small hole about 1/2″ down from the edge and inserted a 5″ piece of bakers twine. This would keep the mail box closed when wrapped around the brad. Then I created a 2″ mailbox flag from red cardstock and set both these pieces aside.

For the image I used a photo of my cocker spaniel puppy when she was about 10 weeks old. She was adorably cute and still is!  I glued the image inside the mail box and added shading with a sketch pencil. It still needed a little something, so I found 4 paper flowers in my stash and glued those above my pup.

For the base of the mail box I cut a 1.25″ x 2″ rectangle from the same yellow cardstock. I notched the top corners and glued this piece into the bottom center of my journal on the right page. Next I glued my mailbox and flag onto my page making sure to slightly overlap the box and the base. I then added a little shading to the outside of the mail box and base with a sketch pencil.

I punched a few flowers from different shades of pink cardstock. I distressed the edges and added stickles to the centers. Next, I glued the flowers into my journal. I used a colored pencil to draw stems and leaves.

For a little extra pizazz I punched a few colorful butterflies from paper I had previously created and glued them into the journal. The last step was to print a sentiment from my computer, cut it out and adhere it to the left page of the journal. I outlined the sentiment with a black Micron pen.

And Voila! I had a cute journal layout with a an opening mail box!

Thanks for stopping by!!


Supplies used:

– 5″ x 8.5″ Art Journal
– Gesso
– Assorted butterfly punches
– Pages from an old book and/or sheet music
– Matte Medium
– Dylusion Inks: Blue, Green
– Small paper cups and a paint brush
– Fiber Paste
– Stencil of your choice
– Palette knife
– White Acrylic Paint
– Tissues
– Ranger Distress Ink – Black Soot
– Cardstock: Yellow, Red, Pink, Fuschia
– Sketch Pencil
– 3″ wide image for inside your mailbox
– Bakers Twine
– Brad
– Aleene’s Tacky Glue
– Flower Punch
– Green Colored Pencils
– Handmade Paper or Cardstock
– Computer Printed Sentiment
– Scissors
– 3″ Circle Stencil
– Stardust Stickles

stickles-stardust


Follow me:  Facebook   •   Pinterest     •    Tumblr     •     Flickr

Visit my Shop on Etsy: ColorExplosionStudio

DSC_004-GreatThingsJournalPages-MainClosed  DSC_0002-GreatThingsJournalPages-MainOpen